
Holiday Baking Repost
These tasty Norwegian sweet buns are perfect for the holidays, so I'm reposting the delicious recipe from my favorite baker, Manuela Kjeilen—owner of Passion for Baking. I first posted it back in 2018 during our "Are You a Master Baker or Disaster Baker?" contest—I hope they bring you just as much joy!
Learning to Bake Norwegian Sweet Buns
I've always struggled with the laborious process of baking show-stopping desserts because I'm just too impatient to make an effort to create recipes that take hours or even sometimes days to complete. Several years ago, I decided to become a better baker despite my resistance to the task and lack of baking acumen.
To accomplish some much-needed training and baking support, I enlisted the help of my sweet friend Manuela Kjeilen, owner of Passion for Baking. Manuela is an entrepreneur born in Norway and a self-made master baker. Together, in 2018, we hosted a bake-along challenge, "Are You a Master Baker Or Disaster Baker?" (visit the link for more details), and our sponsor, Ankansrum Original USA. During the challenge, I learned to make Norwegian Sweet Buns!
Just Too Good Not To Share Again
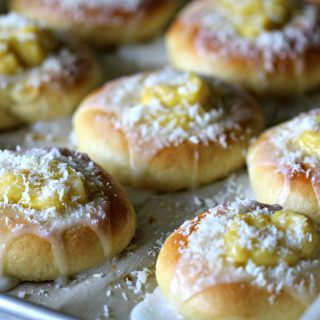
The recipe is just too good not to share again. I hope you enjoy my rendition of Manuela's recipe. The bread is savory, sweet, and delicious, filled with her delightful pastry cream recipe.
Versatility
I've made these sweet buns many times since 2018 with various fillings, such as Nutella, jams and jellies, Swiss cheese, ham, bacon, and eggs. YUM!

A Labor of Love
Despite my love affair with Vanilla Buns, this recipe is a labor of love. You will need a full day to make it, and the dough needs time to rise, not just once but three times. I learned that some things are worth waiting for because they are delicious, and now I can firmly say I am a much better baker for taking the time to learn from the best and continue to practice.
Norwegian Vanilla Buns
Equipment
- 1 Stand Mixer with dough attachment (If you don't own a stand mixer you can use the old-fashioned way, mix and knead the dough by hand
Ingredients
- 2 CUPS 480 ML LUKEWARM MILK
- 2 TEASPOONS DRY ACTIVE YEAST
- 1 CUP 225 G SUGAR
- 8 CUPS 900 G ALL-PURPOSE FLOUR
- 4 EGGS AT ROOM TEMPERATURE
- ½. TEASPOONS SALT
- ⅔ CUP 150 G UNSALTED BUTTER, AT ROOM TEMPERATURE, CUT INTO 10 TO PIECES
For The Filling
- VANILLA CREAM RECIPE
- 2 CUPS 500 ML WHOLE MILK
- 1- 2 TEASPOONS VANILLA BEAN PASTE OR SEEDS OF ONE VANILLA POD
- ½ CUP 85 G SUGAR
- 4 TABLESPOONS CORNSTARCH
- ¼ TEASPOON SALT
- 6 LARGE EGG YOLKS
- 3 TABLESPOONS 45 G CHILLED UNSALTED BUTTER, CUT INTO PIECES
For the Glaze
- 1 CUP 110 G CONFECTIONERS’ SUGAR
- 1-3 TABLESPOONS MILK
- 1 TEASPOON LIGHT CORN SYRUP
- TOPPING
- 1 CUP 150 G COCONUT (I used unsweet flakes)
Instructions
Directions For The Filling
- Heat the milk and vanilla bean paste in a saucepan over medium heat, stirring occasionally, until the milk is hot but not boiling.
- Meanwhile, in a medium bowl, combine the sugar, cornstarch, and salt.
- Whisk in yolks all at once until light and fluffy and the batter reaches the ribbon stage.
- As you continue whisking, slowly add one-third of the hot milk to the yolk mixture to temper the egg yolks.
- Whisk in remaining milk into yolks and return the entire mixture to a saucepan.
- Place over medium heat and whisk frequently until the mixture begins to boil.
- Whisk the mixture vigorously for 2 minutes, while boiling, until the cornstarch dissolves completely.
- Remove the pan from the heat.
- Strain the vanilla cream mixture through a fine-mesh strainer into a bowl.
- Whisk in the butter.
- With a silicon, spatula spread the vanilla cream into a thin layer on a small baking sheet.
- Lay a sheet of plastic wrap directly over the vanilla cream.
- Allow it to cool to room temperature, then refrigerate for a few hours.
- When ready to use, loosen the cream with a spatula or whisk.
- Pastry cream should be refrigerated and used within 3 days of making.
Directions For the Sweet Dough
- Preheat oven to 350F (180 C). Line 2 large baking sheets with parchment paper.
- In the bowl, of a standing mixer, fitted with a dough hook attachment, pour in the warm milk(110-115 on an instant-read thermometer), add the sugar and yeast, and whisk until dissolved.
- Rest for 5 minutes, the mixture should bubble up a little bit.
- Add the eggs, salt, and flour, and mix on low speed until all of the ingredients have come together.
- Continue to mix on medium speed for about 10 minutes.
- After 10 minutes, add the butter to the dough mix, piece by piece, and continue mixing on low speed.
- The butter needs to mix completely into the dough, so stop the mixer occasionally and scrape the sides of the bowl to break up the dough.
- Once the butter is completely incorporated into the dough, mix on medium speed for another 15 minutes, until the dough becomes sticky and soft, and somewhat shiny.
- Increase to medium-high speed for about 1 minute and you should hear a slap-slap-slap sound as the dough hits the sides of the bowl.
- You should then be able to gather it all together and pick it up all at once in one piece when it’s ready.
- Take the dough out of the bowl, cover your beautiful hands with flour, and push each corner of the dough to the middle, all the way around.
- Turn the round dough with the seam side down, into a greased bowl, covered with a kitchen towel and let it rise for 45 to 60 minutes or until doubled in size.
- Divide the dough into 24 equal pieces (I got 34)
- Shape each piece into a ball.
- Lay the buns on prepared baking sheets, spaced about 2″ apart, as they will rise quite a bit.
- With floured hands, press each of the balls down/flat.
- Place a clean tea towel over each of the baking sheets and let rise for about 30/ 45 minutes.
- Remove the tea towel, and with floured hands, lightly press the dough down again with the palms of your hand, and with your knuckles in the center of each bun make an indentation (see the video).
- Place the tea towel over the buns again and let rise for another 30 minutes.
- Just before filling each bun with vanilla cream, you can with your knuckles once again make the indentation a bit larger.
- Fill the centers with a generous amount of vanilla cream /pastry cream.
- Glaze with egg wash, optional.
- Bake until golden brown around the edges, which typically takes about 15-20 minutes.
Directions For Glaze
- As the buns are baking, combine the glaze ingredients.
- Warm the glaze for 30 seconds in the microwave.
- Drizzle glaze over baked buns and sprinkle with coconut.
- In my opinion, the more coconut, the better it tastes.
- Allow the buns to cool for several minutes before enjoying these Norwegian school buns.
- Norwegian Vanilla Buns taste best eaten the same day.


Happy Baking
For more delicious baked goods, visit Baked Goods By Rebecka
Leave a Reply