• Skip to primary navigation
  • Skip to main content
  • Skip to primary sidebar
At Home with Rebecka
  • ABOUT
    • CONTACT
    • TALENT CONTACT
    • PRIVACY POLICY
    • DISCLAIMER
  • RECIPE INDEX
    • RECIPES
    • FLORAL EDIBLES LIST WITH PHOTO
    • ORGANIC EDIBLE FLOWERS RESOURCES
    • HOME CANNING SAFTEY GUIDELINES
    • VIDEOS
  • OPERA JOURNEY
  • AWARDS and PUBLICATIONS
    • Facebook
    • Instagram
    • Pinterest
    • YouTube

Canning Sterilization & Jar Preparation

July 14, 2010 by athomewithrebecka 4 Comments


IMG_4329


There is no need to go out a buy a bunch of new equipment for this process. What you have in your own kitchen will do fine. If you need to  add a few utensils for your canning projects most neighborhood grocery stores carry all the necessary items.
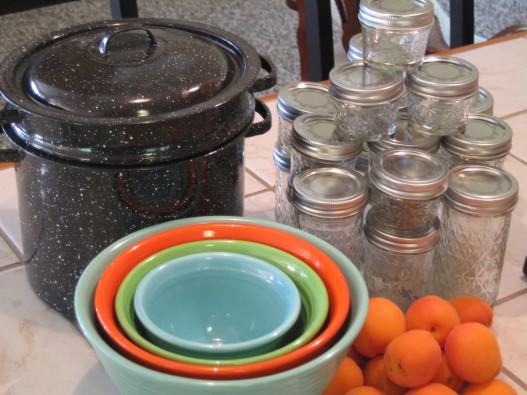
What you will need: 

Use any large pot you have at home.
Jar Funnel for easy pouring
Ladle for scooping hot liquids
Tongs to remove and arrange whole or chopped fruits and vegetables in Canning jars
Small stove top pan to sterilize the jar bands
Regular or wide mouth canning jars with lids and bands
Jar lifter to safely remove jars from the water-bath (I use a clean hand towel)
Tablespoon, to skim foam off hot liquid
Measuring cups
Measuring spoons
Kitchen timer
Cutting board
Sharp knife

Jar Preparation

Safe handling of all your utensils, jars and kitchen surfaces is a must when canning at home. These guidelines must be followed to make sure food safety. We wouldn't want our friends and family getting sick from eating food that we've prepared for them, so be vigilant with your jar preparation.

Select Jars and Cleaning

Make sure to check all your jars for any cracks or nicks in the surface. Discard  jar if you see any signs of damage. Check lids and rims for dents or unevenness and discard any that are defective or damaged. I like to use an antibacterial spray on my counters surfaces and in the sink before canning. Fill your clean sink with hot soapy water and gently wash jars with a clean rag. Make sure not to use brushes with wire or previously used sponges. Rinse jars with hot water and place on a clean kitchen towel.

Heating

Jars must be heated for 10-15 minutes before filling to kill any remaining bacteria. Submerge the jars into pot with water about 3-5 inches deep (smaller jars can be stacked) and bring water to a boil. Right when the water begins to boil, reduce the heat and simmer until ready to use. If you have a kitchen thermometer check the temperature occasionally (180 degrees F). I just keep my jars at a low rumble so they stay extra hot and then I don’t have to stop to check the water while I’m in the middle of canning. Never pour hot liquids into a cold jar.

Lid and Band Preparation

Two piece vacuüm caps generally come with your boxed sets of jars.
Remove the lids and bands and check for any damage. Wash the lids and bands in hot soapy water (manufactures suggest never to reuse the lids or bands) place only the lids in hot water on the stove and simmer for 10-15 minutes. When the sealing compound is heated to 180 degrees F you will make a better seal.

Now you're ready to go…

DISCLAIMER:All content on this blog are the author’s personal views and opinions. The information provided is solely for entertainment and does not constitute any legal, medical, or other professional advice. It is not to be taken as fact nor absolute truth and it is not the author’s intention to do harm or to injure others. The author will not be held responsible for advice, tips, techniques, and recommendations used. Readers of this blog are to use it at their own free will and at their own risk.I can strictly using the traditional methods that have been done for decades. My desire is to preserve safe, healthy, tasty food for my readers and loved ones, however you may want to research USDA guidelines prior to using the older methods found here.  I am not affiliated with the USDA, any of the state Cooperative Extension Services, or any of the manufacturers of canning supplies and equipment. I am not a Certified Master preserver but have learned from traditions passed down for hundreds of years.Content Validity and AccuracyMistakes can be made and every attempt will be made to correct those errors. However, validity and accuracy of content may also change over time and information may become outdated.

For more detailed information 

« Watermelon Pickles Recipe
Mt. Vesuvius Erupts in my Kitchen »

Reader Interactions

Comments

  1. Rebecka

    July 17, 2010 at 5:25 pm

    Thanks Cali, I've love using bleach unfortunately, now that we live in the mountains I’ve had to adjust to septic and well water. Bleach is a really big no-no. I’ve had to find a safer method of disinfecting and with all the new environmentally safe products on the market, it’s been a breeze. On the upside, I have the sweetest tasting water from the natural spring that runs under our property. I really believe that the water we use to cook with, makes a big difference in the taste of the finished product. I couldn't stand the taste or smell of the water when I lived in Florida. It smelled like sulfur when you took a shower and with all the rotting mangroves, the smell of spoiled eggs was disgusting. I never really got used to it. I used filtered water for all my cooking but I could always taste the nasty sulfur.

    Reply
  2. Cali Cassels Hicks

    July 17, 2010 at 1:30 am

    Rebecka,I love the tip about the antibacterial spray. That should save me a lot of time in the future. I've been washing everything down with a bleach-based cleaner that requires rinsing. You're a genius!Thanks,Cali

    Reply

Trackbacks

  1. Fresh Fig and Golden Tomato Chutney says:
    August 25, 2013 at 5:13 PM

    […] bath for 15 minutes By Rebecka Evans At Home with Rebecka https://athomewithrebecka.com/ See Sterilization and Jar Preparation for detailed canning […]

    Reply
  2. Canning Lime Pickles says:
    December 28, 2012 at 7:54 AM

    [...] during this step. Separate the hot syrup in half prior to covering cucumbers, add a few drops red food coloring to half and a few drops green to the other half, stir with a wooden spoon until food [...]

    Reply

Leave a Reply Cancel reply

Your email address will not be published. Required fields are marked *

Recipe Rating


This site uses Akismet to reduce spam. Learn how your comment data is processed.

Primary Sidebar

Hi, I'm Rebecka, living my best life in Denver, Colorado with my darling husband Blake. I’m a mother to five children, Gam Gam to seven priceless grandchildren, and doggie mommy to two fur babies. My most notable wins are Food Network’s, Clash of the Grandmas, and the title of BACON World Champion.

More about me →

Rebecka Evans-Freelance Writer at FYI50+ Magazine

World Food Championships FINAL TABLE

Sandwiches

  • Tarragon Chicken Salad Sandwiches
    Tarragon Chicken Salad Sandwiches
  • Coffee Bacon BLT with Smokey Pimento Cheese Spread
  • Wakamatsu's Peachy Good Waffle Sandwich
    Wakamatsu's Peachy Good Waffle Sandwich
  • Sandwich Loaf recipe
    Women's Auxiliary Luncheon Sandwich Loaf

Trending Cakes

  • Strawberry Creme Crinkle Cake
    Strawberry Crème Custard Crinkle Cake
  • Strawberry Angel Food Cake
    Strawberry Angel Food Cake
  • Lima Bean and Ham Stew Recipe
    Lima Bean & Ham Stew with Sweet Cornbread Cake
  • The "Upside-Down" Filled Jelly Roll Cake
    The "Upside-Down" Pineapple Filled Jelly Roll
https://youtu.be/Hn9HuhgLIEk
https://youtu.be/_WQZag2VAJ8

Footer

↑ back to top

About

  • Privacy Policy
  • Disclaimer

Newsletter

  • Sign Up! for emails and updates

Contact

  • Contact

Copyright © 2021 At Home with Rebecka